1. Add bank account for salary payments (via pain.001)

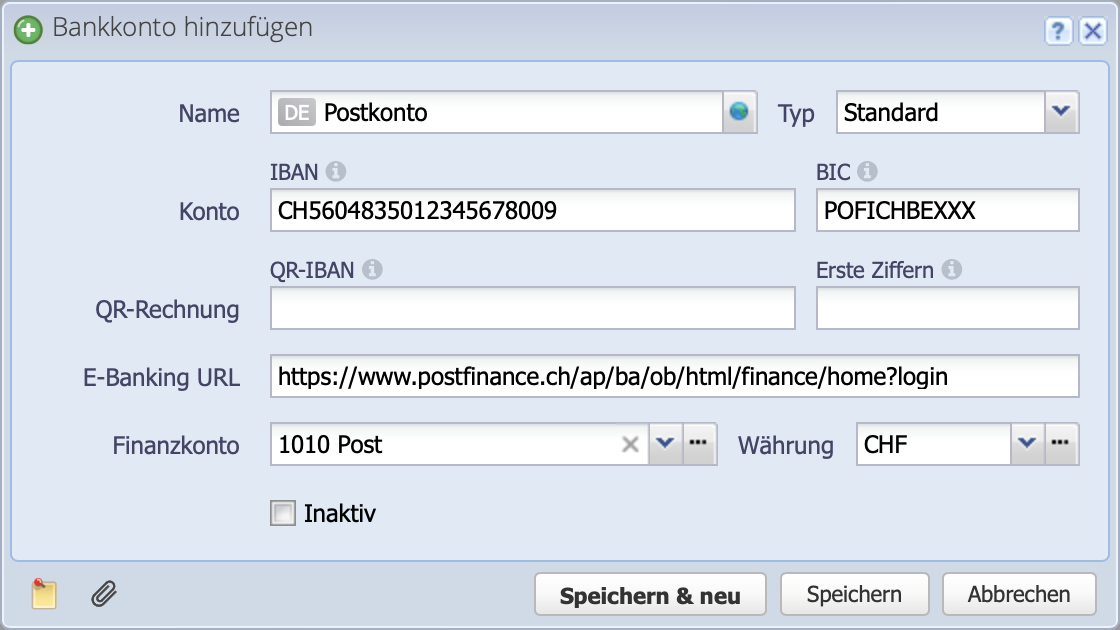
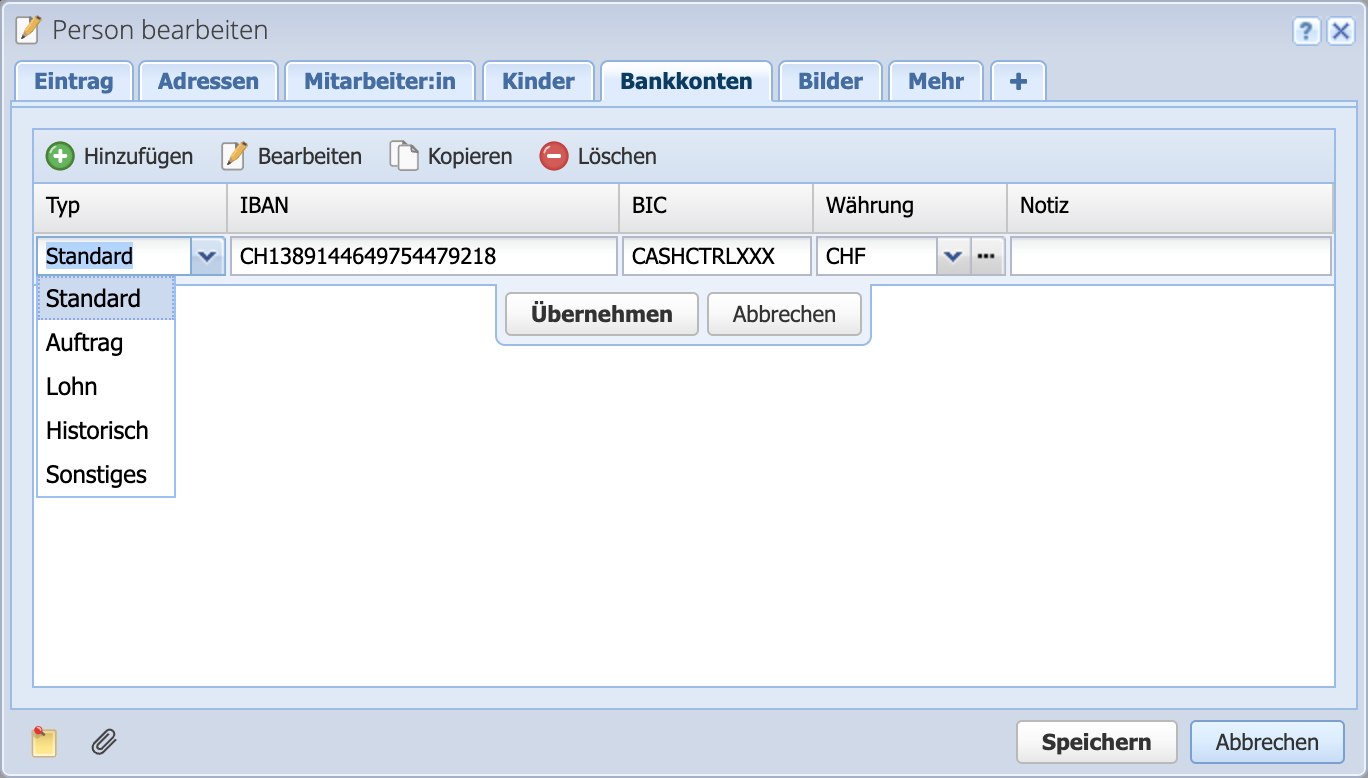
A bank account is required to pay salaries using the pain.001-file. This is created in the Accounts area in the Bank accounts tab via Add.

In the Type field, you can define whether it should be the standard account, i.e. also for creditor payment, or whether it should only be used for salaries.

Name and BIC are mandatory fields, IBAN or QR-IBAN can be filled in as desired.

The financial account must be linked to the bank account so that the bank account is automatically filled in for payroll accounting book payment. In the example, account 1010 Post is selected.

Screenshot of Adding bank account or payroll account

2. Update location

The location (or several) can be edited under Settings Locations. Switch to the Other data tab here.

An account created in the previous step can be set in the Bank account field. This is important if there are several locations with different accounts. If the field remains empty, the default account set in the previous step will be used.

The other fields are optional, the phone number (salary certificate) is used on the salary certificate so that the person responsible can be contacted directly if there are any questions about the salary.

Close the dialog with Save.

Screenshot Edit location and add data for payroll accounting

3. Create or edit insurances

In the Persons area, demo insurances are created in the Insurance category. These can be edited and filled with your own insurance data. Alternatively, delete demo insurances and edit existing insurance contacts and check the Insurance box. The Insurance tab then appears and the data for the insurance type and contract numbers can be entered.

Go to insurances tutorial

Screenshot create insurance

4. Make a person an employee

To enter a salary statement for a person, it must be saved as an employee.

In the Persons area, open the dialog for an existing person via Edit.

Now check the Employee role at the top of the dialog and adjust the category if necessary.

It makes sense to fill in the Salutation field, as well as the Address tab with canton information, as salary types vary depending on the canton, e.g. child allowances or withholding tax.

Screenshot person edit dialog

5. Employees: add information

The social security number (AHV no.) and the date of birth are now entered in the Employee tab. The latter is important for the AHV contributions, as these are only due from a certain age.

It is also possible to select a layout for the salary statement and a place of work.

The date of entry or exit is set via Add in the entries and exits area. If no value is set here, CashCtrl assumes that the person has been with the company — i.e. active — for a long time.

Screenshot of the employee tab for a contact

6. Record children (optional)

If the employee has children, they can be added in the Children tab. This is required for child or education allowances.

A new child is entered via fa-arrow-right Add. Name and date of birth are a required entry as well as the date from which the allowance is received. If a child is in education, the date is entered in the In education since field.

Screenshot of the children tab to register children with an employee

7. Add bank account to employee

For the salary payment via pain.001 file, it is necessary to enter a bank account for the person. A new bank account is created in the Bank accounts tab via Add. Select the type of account and set the IBAN and currency. The BIC is optional, not mandatory for a pain.001 file.

Save the person, that's all the preparations.

Screenshot of the bank account tab, where the bank details of employees are entered.

8. Create salary statement

Open the dialog for a new salary statement in the Salaries area via Add.

Monthly salary is set by default in the Template field. Templates for hourly wages and options with withholding tax are available here via the drop-down menu.

The date field controls the month for which the salary statement is created. By default, the 20th of the month is set and the 25th of the month is set for the payment date. The other fields such as status, no. and currency can be optionally adjusted.

It is now mandatory to select an employee.

This tutorial shows you how to edit a payroll template.

Screenshot of the creation of a payroll statement

Explanation for newbies:
Each line in the table is referred to as a salary type. The salary types are divided into salary, allowances and deductions.

Screenshot of the edit dialog of a payroll statement with highlighted salary types

9. Add monthly or hourly salary

The basic salary is now entered first in the still grayed-out line Monthly wage. The salary type is edited by double-clicking on the corresponding salary type or by selecting it and clicking on edit.

The basic salary, the number of days and the workload (degree of employment) are now entered. The AHV/ALV deductions are calculated automatically with Accept.

Screenshot of the editing window of the monthly salary for entering the basic salary, the number of days and the degree of employment

10. Add allowances and deductions

The employee deductions for UVG/BVG and the employer contributions for UVG are opened by double-clicking and entered manually.

Further deductions and allowances are added to the salary statement via Add. In the example, we add a child allowance.

Note: Salary types can be added without being filled (for later).

Screenshot of the drop-down menu for adding additional salary types such as allowances or deductions

11. Set insurances

The insurances stored for the various insurance types (AHV / BVG / FAK etc.) are set in the Insurances tab. Add an insurance for each insurance type that is on the salary statement.

For further deductions such as ALVZ or UVGZ, further insurances are selected here.

These can be edited and added in the Persons module in the Insurance category.

Screenshot of the insurance tab, where the insurances are set.

12. Set up recurrence

To create a recurring payroll, configure the repetition at the bottom left with the Recurrence button.

The document can be generated at an earlier time to ensure that it is sent at the correct time. The default is 20 days earlier.

If required, set the notification (to your own e-mail address) that new salary statements have been created.

Screenshot of the recurrence dialog where the pay run is set

13. Done - send salary statement

Click Save & Open to open the preview of the salary statement. This can now be sent to the employee by e-mail via send e-mail.

Using Next step Create payment order, different variants of a payment order are created.

Go to salary payments tutorial

Screenshot of the PDF preview of a finished payroll statement, which can be sent by e-mail.